Tag Archives: Stamp Art

Wonderful Snow Day – Tutorial #145

dsc06720.JPG

Felt like playing around with a snow scene today so I pulled out some old sets from Stampin’ Up.  Before we get into the tutorial though I have an announcement to make.  🙂

dsc06689.JPG  The winner out of 320 entries for the Cuddles & Hugs Stamp set is. . . . . . . .. . . . . . . .

Christina Francowho wrote “Your eye for color and placement is always mind boggling! Thanks for the generous blog candy (love Gina K!!) and also for your generous sharing of your time to make these tutorials!! It must be very time consuming to stop and photograph and write up all of the explanations. We appreciate YOU!!”

Congratulations Christina, please e-mail your address to [email protected] and I will pop this set in the mail to you.

Thanks everyone for playing along!

Now on with today’s tutorial. . . .

Supplies:

Stamps: Stampin’ Up Snow Angels & Lovely as a Tree
Paper: Stampin’ Up Whisper White, Not Quite Navy & Baja Breeze
Ink: Stampin’ Up Not Quite Navy & Baja Breeze, Palette Noir Black
Accessories: Prismacolor Markers, Silver Brads, Red Silk Ribbon, Sponge, White Gel Pen, Brayer, Tim Holtz Ruler, Push Pin

dsc06716.JPG

Stamped Boy on a 4″ x 6.25″ of Whisper White card stock using Palette Noir Black ink.

dsc06690.JPG

Masked the snow area with a torn post it note.

dsc06691.JPG

Brayered on Baja Breeze ink.

dsc06692.JPG

Brayered on Not Quite Navy ink, not covering the Baja Breeze ink entirely.

dsc06693.JPG

Inked the tops of the trees only on this tree stamp with Palette Noir Black ink.  I did this in order to omit the ground area of the stamp.

dsc06694.JPG

Sponged Not Quite Navy ink right at the post it note edge.

dsc06695.JPG

Removed the post it note and extended the tree trunks with a Black marker.

dsc06696.JPG

Colored the boy’s coat with a Prismacolor Sky Blue Light marker.

dsc06697.JPG

Added Blue Slate marker to his hat and coat.

dsc06698.JPG

Went over the coat and hat again with the Sky Blue Light marker to blend the two colors together.

dsc06699.JPG

Colored the mittens, gloves and a bit on the hat with a Scarlet Lake marker.

dsc06700.JPG

Added Mahogany Red marker to the scarf and mittens.

dsc06701.JPG

Colored the boots with a Light tan marker.

dsc06702.JPG

Added Walnut marker to the boots.

dsc06703.JPG

Went over the boots again with the light tan marker to blend the colors together.

dsc06704.JPG

Added Buff marker to his face.

dsc06705.JPG

Went over the snow angel lines in the snow with a Cool Grey 10% marker.

dsc06706.JPG

Added foot prints in the snow with the Cool Grey 10% marker.

dsc06707.JPG

Made dots in the sky for snow with a White Gel pen.

dsc06708.JPG

Sponged Not Quite Navy ink around the edge of the main image panel.

dsc06709.JPG

Pierced lines on each side of the main image panel using the Tim Holtz Ruler and a push pin.

dsc06710.JPG

Added Ribbon and brads and here is the complete card measuring 5″ x 6.5″.

dsc06720.JPG

Before I end this post I wanted to share a few photos from one of yesterday’s Beginner Brayer workshops from Marco Paper in Dayton, Ohio.  Some of the ladies in yesterday’s workshops drove very long distances to attend.  Ladies it was such a pleasure meeting and sharing with you, each and everyone of you are brayer masters now!

4.jpg    3.jpg

2.jpg    1.jpg 

Have a fantastic Sunday!!!!

Until my next post. . . . . . . . . . . . .

Hugs,

Michelle

Links to all my tutorials can be found here:  https://zindorf.splitcoaststampers.com/tutorials-ive-written/

Frequently asked questions answers:  https://zindorf.splitcoaststampers.com/frequently-asked-questions/

Morning Silence – Tutorial #141

dsc06586.JPG

Happy Halloween Everyone! 

Since it is the holiday my thoughts were I should make a Halloween card, but then why make one on the holiday when I don’t need it.  I pondered this for about 15 minutes and then came to the conclusion you would rather look at a card that would inspire you for a project in the immediate future, cold months ahead.  🙂  This really turned out to be a man card.  At least the men in my life would enjoy this one.

My cards usually have many, many steps, but this one turned out to be quite quick for me.  Note, I said quick for “Me”.  No markers, no heat embossing, no brayer, GASP!  I know you probably went back and re-read that last sentence in disbelief.  🙂

Let’s get started.

Supplies:

Stamps: Impression Obsession “Branches of a Tree” & Close to My Heart “Warm Memories”
Paper: Stampin’ Up Whisper White, Basic Black & Soft Sky
Ink: Stampin’ Up Basic Black, Not Quite Navy, Baja Breeze & Soft Sky
Accessories: Silver Brads, Stamp-A-Ma-Jig & Sponge

dsc06587.JPG

Stamped the tree twice with Soft Sky ink on a 4″ x 5.5″ piece of Whisper White Card stock.

Sponged Soft Sky ink in the center of the card stock.

dsc06576.JPG

Stamped twice the tree again with Baja Breeze ink.

dsc06577.JPG

Sponged Baja Breeze ink around the outside of the card stock, leaving the Soft Sky ink showing in the middle.

dsc06578.JPG

I came up with these blues to use by testing them on my scrap paper.  🙂

dsc06579.JPG

Stamped the tree twice again with Basic Black ink.

dsc06580.JPG

Sponged Not Quite Navy ink around the outside of the card stock, not covering the Baja Breeze sponged ink entirely.

dsc06581.JPG

Sponged Basic Black ink around the very edge of the card stock, not covering the Not Quite Navy ink entirely.

dsc06582.JPG

I got out my Stamp-a-ma-jig to figure out where I wanted my deer to be.  Such a handy tool.

Note:  if you don’t have a Stamp-a-ma-jig you need one!  It is so nice to stamp the image on the clear sheet that comes with the tool and move it around on top of the card stock to see exactly how you would like to place an image on your piece.  🙂  Nope I don’t own stock in the Stamp-a-ma-jig company, lol.  I wish I did though!

Anyway, I stamped the deer using Basic Black ink.

dsc06583.JPG

Assembled the card front and added silver brads to each cover of the main image panel.  Here it is complete measuring 5″ x 6.5″.

dsc06586.JPG

May your Halloween be a happy one!

Until my next post. . . . . . . .. . . . . . .

Hugs,

Michelle

Links to all my tutorials can be found here:  https://zindorf.splitcoaststampers.com/tutorials-ive-written/

Here is a link to my workshop calendar if you want to get info on beginner and advanced Brayer workshops:  https://zindorf.splitcoaststampers.com/workshop-calendar

Frequently asked questions answers:  https://zindorf.splitcoaststampers.com/frequently-asked-questions/

Fallen Leaves – Tutorial #132

dsc06352.JPG

A while back I asked the readers of this blog to leave me a comment telling me their most favorite thing about Autumn.  Close to half of the comments mentioned walking through fallen leaves, feeling them crunch beneath their feet.  I agree whole heartedly that it’s a wonderful thing in the Autumn months.  Today’s card is my version of fallen leaves to try to echo that feeling and put it on paper.

Let’s get started 🙂

Supplies:

Stamps: Stampin’ Up With Gratitude & Touch of Nature
Paper: Stampin’ Up Whisper White, Chocolate Chip & Old Olive
Ink: Stampin’ Up Close to Cocoa, Really Rust, Basic Black, Chocolate Chip & Old Olive
Accessories: Crop-a-dile, Eyelets, Brads, Raffia, Tim Holtz embellishment, Tim Holtz Ruler, Sponges, Prismacolor Markers, Versamark Pad and Marker, Dimensionals, Fine Detail Embossing Powder, Heat gun, Photo Corner Punch

dsc06358.JPG

Stamped acorns by first loading my stamp with Versamark and then loading it with Close to Cocoa ink before stamping it on a 4.5″ square piece of Whisper White card stock.

dsc06325.JPG

Heat embossed the images using fine detail clear embossing powder and a heat gun.

dsc06326.JPG

Colored the bottom half of the acorns with a Prismacolor Sienna Brown marker.

dsc06327.JPG

Colored the top half of the acorns with a Sand marker.

dsc06328.JPG

Stamped leaves by first loading my stamp with Versamark and then loading it with Really Rust ink before stamping them.

dsc06329.JPG

Heat embossed the leaves with fine detail clear embossing powder and a heat gun.

dsc06330.JPG

Colored the leaves with a Burnt Ochre marker.

dsc06331.JPG

Let the marker dry and then went over the darker parts of the leaves again with the Burnt Ochre marker to give a bit of variation in color.

dsc06332.JPG

Colored over the leaves and acorns with a Versamark marker and heat embossed the images with clear embossing powder and a heat gun.

dsc06333.JPG

dsc06334.JPG

Stamped the leaves a few more times by first loading my stamp with Versamark and then loading it with Always Artichoke ink before stamping them.  Heat embossed the images using clear embossing powder and a heat gun.

Note:  There is no need to wipe the Always Artichoke ink from the already embossed images before heat embossing them.  Once you heat emboss the Always Artichoke leaves the ink will magically disappear from the already embossed images.  Try it you will see.  🙂

dsc06335.JPG

Colored the green leaves with a Limepeel marker.

dsc06336.JPG

Added Light Olive marker to the darker parts of the green leaves.

dsc06337.JPG

Colored over the green leaves with a Versamark Marker and heat embossed them with clear embossing powder and a heat gun.

dsc06338.JPG

dsc06339.JPG

Sponged, using a circular motion, Chocolate Chip ink all over the card stock.

dsc06340.JPG

Decided I wanted a warmer tone to the background so I sponged Really Rust ink all over entire piece of card stock.  A girl can change her mind if she wants, right?

dsc06341.JPG

Over stamped the entire card stock with the leaf stamp using Chocolate Chip ink to create the look of brown leaves under the more colorful leaves.

dsc06342.JPG

Let the Chocolate Chip ink dry a moment and then wiped the Chocolate Chip ink off of the embossed images using a soft rag.

dsc06343.JPG

Sponged Basic Black ink around the edge of the card stock.

dsc06344.JPG

Ok, I’m not one for a bunch of embellishments.  It’s not that I don’t own a ton of embellishment.  I have drawers and drawers full of them.  I usually just can’t figure out what to do with them, lol.  I can spend more time trying to place just one embellishment on a card then it took me to create the rest of the entire card.  So I usually don’t embellish.

This is probably the most you will ever see me embellish, lol.

I added punched corners.

dsc06345.JPG

Used my Crop-a-dile to add eyelets.  Man those eyelets haven’t seen daylight in over a year, lol.

dsc06346.JPG

dsc06347.JPG

If you want a cheap solution to ribbon for your fall cards try Raffia.  🙂

Added Raffia and a Tim Holtz embellishment that has the sentiment of Wonderful on it.

dsc06348.JPG

Frayed the raffia ends.

dsc06349.JPG

Pierced holes in two sides of my out card-stock layer using the Tim Holtz ruler and a push pin.

dsc06350.JPG

Dimensionals, Wow!  I really haven’t popped something up for the longest time.

I used lots of them, especially in the middle of the main panel so it wouldn’t cave in.  🙂

dsc06351.JPG

Here is my finished card front, popped up and embellished.  It measures 5.5″ square.

dsc06352.JPG

Hope you are able to get out today and enjoy the sites and sounds of a beautiful Autumn day.

Until my next post. . . . . . . . . . .

Hugs,

Michelle

Links to all my tutorials can be found here:  https://zindorf.splitcoaststampers.com/tutorials-ive-written/

Here is a link to my workshop calendar if you want to get info on beginner and advanced Brayer workshops:  https://zindorf.splitcoaststampers.com/workshop-calendar

Autumn Forest Floor – Tutorial #130

 dsc06304b.jpg

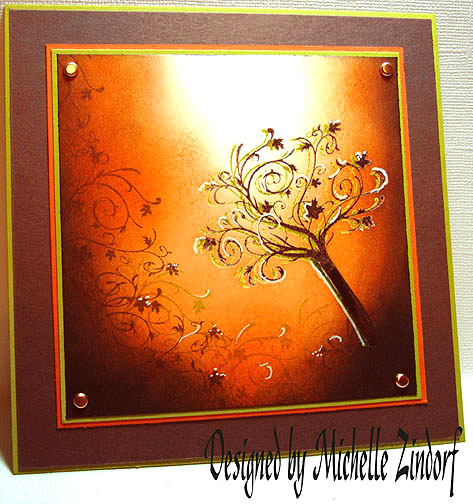
Color Challenge Time!  I love the color challenges on Split Coast Stampers on Tuesdays.  I took a stab at today’s Color Challenge CC187 to use the Stampin’ Up colors Chocolate Chip, Kiwi Kiss and Tangerine Tango.  I found this to be a great color combo for Autumn.  Here is a link to the challenge if you want to play along:  https://www.splitcoaststampers.com/forums/showthread.php?t=388280

You may have noticed lately that I have been trying to make use of the white of my paper.  Today I used the white of the paper and made it my light source in the scene.

Well this is tutorial #130.  Are you crying Uncle?  Had enough?

If not, let’s get started on the tutorial.  🙂

Supplies:

Stamps:Inkadinkado “Fall Season”
Paper: Stampin’ Up Whisper White, Kiwi Kiss, Tangerine Tango & Chocolate Chip
Ink: Stampin’ Up Kiwi Kiss, Chocolate Chip, Tangerine Tango & Basic Black
Accessories:Versamark Pad & Marker, Sponges, White Gel Pen, Fine Detail Clear embossing powder, heat gun, Stampin’ Up Markers Chocolate Chip & Old Olive, Copper Brads

dsc06309.JPG

Stamp tree by first loading stamp with Versamark and then loading with Chocolate Chip ink before stamping.  I also did not put the Versamark or the ink on the very bottom of the tree trunk to omit the root part of the stamp.  After stamping I extended the trunk of the tree with a Chocolate Chip marker and colored over the marker with a Versamark marker.

My Whisper White card stock measures 4.5″ square starting out, but I cropped it at the end to measure 4.25″ square due to a nice chocolate chip fingerprint at the top, lol.

dsc06288.JPG

Heat embossed the image using fine detail clear embossing powder and a heat gun.

dsc06289.JPG

Over stamp the tree a bit to the left by first loading the stamp with Versamark and then loading it with Kiwi Kiss ink before stamping it.  I omitted the root part of the tree again.  Extended the trunk with an Olive Marker and then colored over the marker with a Versamark marker.  Heat embossed the image using clear embossing powder and a heat gun.

dsc06290.JPG

dsc06292.JPG

Sponged on Tangerine Tango ink, using a circular motion and be more heavy toward the outside edges. 

Note:  If your sponged ink looks really splotchy add more ink until it smooths out.

dsc06294.JPG

Sponged on Chocolate Chip ink.

dsc06295.JPG

Stamped the top of the tree with Chocolate Chip ink at the bottom of and left side of the card stock.

dsc06296.JPG

Sponged on Basic Black ink at the bottom two corners.

dsc06297.JPG

Stamp the top of the tree image with Kiwi Kiss at the bottom of the card stock.

dsc06298.JPG

Added a few white gel pen highlights to the tree and the plants at the bottom of the card stock.

dsc06300.JPG

Here is the card front finished measuring 5.5″ square.

dsc06304b.jpgHope this tutorial has inspired you to use this color combination.  I love it.

May your day be filled with light!

Until my next post.. . . . . . . . . .

Hugs,

Michelle

Links to all my tutorials can be found here:  https://zindorf.splitcoaststampers.com/tutorials-ive-written/

Here is a link to my workshop calendar if you want to get info on beginner and advanced Brayer workshops:  https://zindorf.splitcoaststampers.com/workshop-calendar

Harvest Moon – Tutorial #101 and Blog Candy

dsc05504.JPG

It’s been unseasonally cool here in Ohio for August and it makes me want to think of fall.  Fall is my favorite, favorite, favorite season of all.  The colors just speak to my creative side.

Also, I wanted to use these great stamps by Fire Cracker Designs By Pamela.  Here is a link if you want to check them out: https://www.safesecurestore.com/stores/merchant.mvc?Screen=SFNT&Store_Code=firecrackerdesignsbypamela   Love them!

I’m always happy to get a set of stamps that has images, such as the corn stocks that are in different sizes.  Makes making scenes with depth so much easier.  So you stamp creators out there keep that in mind, please, lol.

Oh yeah, I’m giving this card away as blog candy!  

So to enter for a chance to win this card, please leave me a comment on this post telling me your favorite thing about the Fall Season.  If you are getting this blog update by e-mail you will need to click this link to leave a comment on this blog post:   https://zindorf.splitcoaststampers.com/2008/08/13/harvest-moon-tutorial-and-blog-candy/

I will use a random number generator to pick the winner on the morning of Saturday, August 16th. 

Ready for this tutorial?  It’s a long one today, so grab a cup of your favorite hot beverage and lets get started. 🙂

Supplies:

Stamps: FireCrackerDesignsByPamela
Paper: Stampin’ Up Whisper White, Baja Breeze, Basic Black
Ink: Stampin’ Up Baja Breeze, Night of Navy, Not Quite Navy, Basic Black, Old Olive, Close to Cocoa, Palette Noir Black
Accessories: Brayer, Clear Embossing Powder, Heat Gun, Piercing Tools, Brads, Prismacolor Markers, Versamark Pad and Marker, Sponges,Post it Notes, Coluzzle Circle Template, Fine tip Black marker

dsc05507.JPG

Stamped the scarecrow on a piece of 4.25″ x 5.75″ piece of Whisper White Card stock with Palette Noir Black ink.  I used this ink so I can color with Solvent based Prismacolor markers and don’t have to worry about it running.

dsc05469.JPG

Colored with Prismacolor Eggshell Marker.

dsc05470.JPG

Added Prismacolor Sand.

dsc05472.JPG

Added Prismacolor Cloud Blue.

dsc05473.JPG

Added Prismacolor Blue Slate.

dsc05474.JPG

Shaded tan areas by going over parts of them with the Eggshell marker.

Nice thing about Solvent based markers, you can shade by coloring and letting it dry and then going over parts of it to get a darker color.

dsc05475.JPG

Colored Shirt with Prismacolor Goldenrod.

dsc05476.JPG

Added Prismacolor Tuscan Red.

dsc05477.JPG

Shaded the Shirt by going over parts of it again with the Goldenrod marker.

dsc05478.JPG

Colored over the entire image with a Versamark marker and heat embossed using clear embossing powder and a heat gun.

dsc05479.JPG

dsc05480.JPG

Stamped small Cornstalks by first loading the stamp with Versamark and then Old Olive ink before stamping.

dsc05481.JPG

Heat embossed images using clear embossing powder and a heat gun.

Note:  you do not have to clean the ink or embossing powder off of the scarecrow.  It will melt right into the embossing powder on the scarecrow and disappear.

dsc05482.JPG

Colored in the stalks with a Prismacolor Eggshell marker.

dsc05483.JPG

Colored over the stalks with a Versamark marker and heat embossed using clear embossing powder and a heat gun.

dsc05484.JPG

dsc05485.JPG

Stamped large cornstalks by first loading the stamp with Versamark and then Close to Cocoa ink before stamping.

dsc05486.JPG

Heat embossed images with clear embossing powder and a heat gun.

dsc05487.JPG

Colored in the large stalks with a Prismacolor Sand marker.

dsc05488.JPG

Colored over the large stalks with a Versamark marker and heat embossed using clear embossing powder and a heat gun.

dsc05489.JPG

dsc05490.JPG

Cut a circle out of a Post it note being sure to have part of the circle cut from the sticky part of the Post it note.

dsc05491.JPG

Used the post it note circle as a mask for the moon.

dsc05492.JPG

Brayered on Baja Breeze ink at the top and bottom of the card stock leaving a light space in the middle.

dsc05493.JPG

Brayered on Not Quite Navy ink at the top and bottom of the card stock not covering the Baja Breeze ink entirely.

dsc05494.JPG

Brayered on Night of Navy ink at the top and bottom of the card stock not covering the Not Quite Navy ink entirely.

dsc05495.JPG

Removed post it note mask.

dsc05496.JPG

Sponge some Baja Breeze ink over the Moon using a swiping motion from side to side to streak it.

dsc05497.JPG

Sponged Basic Black ink around the card edge to get it really dark.  The darker you get the outside of the scene the more the lighter parts in the middle pop!

dsc05498.JPG

Assembled card front and used a Piercing tool and pierced around the moon edge. 

dsc05499.JPG

Drew a line with a fine tip black marker from pierced hole to pierced hole to create some faux stitching.

dsc05500.JPG

Used the Tim Holtz ruler and a piercing tool to pierce the middle panel edge.  Oops!  check out that crocked right pierced line.  Covered the mistake with a brad in the right upper and lower corner, lol.   And you thought I didn’t make mistakes!  Hah!!!

dsc05501.JPG

Added more brads and here is the finished card measuring 5″ x 6.5″. 

dsc05504.JPG

Whew, that was a long project! 

Hope your day is filled with early cool Fall breezes and moon lite night.

Until my next post. . . . .. . . .. . . . .

Hugs,

Michelle