
I’m feeling generous today. It is my last day at work before my vacation starts. YIPEEEE! So today I have a tutorial for you and the finished piece is being given away as blog candy.
So to enter for a chance to win this framed piece, please leave me a comment on this post telling me to enter you. If you are getting this blog update by e-mail you will need to click this link to leave a comment on this blog post: https://zindorf.splitcoaststampers.com/2008/07/25/framed-scene-tutorial-and-more-blog-candy/
I will use a random number generator to pick the winner on the morning of Tuesday, August 5th, which by the way is the next time I will be posting a stamping project. I will be posting the winner of yesterdays blog candy tomorrow morning before I leave. 🙂
A little about the frame. I don’t buy new frames for anything. I like to poke around at thrift stores, flea markets and garage/barn sales for them. When looking at framed pictures for sale, I’m really looking at the frame. What is inside of the frame doesn’t matter, because I’m going to throw it away. The little frame I used today is solid wood and has a nice easel back to it and I paid 25 cents for it. I also buy really large wood framed pictures, generally not paying more than $2 for them and use them for my pastel paintings. New they run from $50 to $75. I found I can pick the frame before I do a painting and then paint it using the dimension I need so it will fit in the frame (cart before the horse I guess, lol). I also cut my own mats, big savings also.
Ok, enough about that, on with the tutorial. 🙂
Supplies:
| Stamps: Stampin’ Up Spring Solitude & Lovely as a Tree |
| Paper: Stampin Up Whisper White & Basic Black |
| Ink: Stampin’ Up Blue Bayou, Perfect Plum, Close to Cocoa, More Mustard, Basic Black, Soft Sky & Pale Plum |
| Accessories: Brayer, Post it Notes, Sponges, White Gel Pen, Fine point Black marker, Frame |

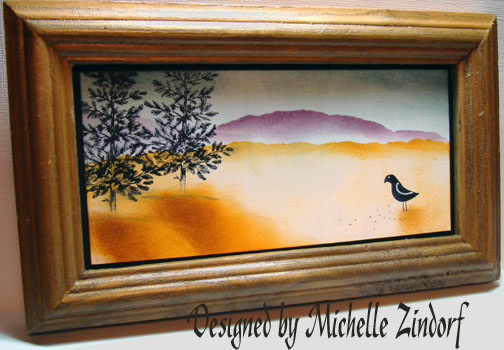
Brayered Soft Sky ink on the top 1/2 of a 6″ x 3″ piece of Whisper White card stock.

Tore Post it Notes (through the sticky part) to use as a mask for the sky while I put in the horizon line.

Sponged on More Mustard ink being darkest at the post it note edge.

Removed mask and stamped bird with Basic Black ink.

Tore a new piece of post it note to use to mask the sky and create a mountain in the distance. Sponged Pale Plum ink in the open area. Opps! Missed the photo of this.

Used torn post it notes again for a mask to create another mountain in the distance and sponged on Perfect Plum ink so it is a little darker than the first mountain.

Removed masks and used a White Gel pen to define the birds wing and eye.

Used a fine point marker to put dots on the ground at the birds feet to simulate bird feed.

Sponged a little Blue Bayou ink at the top of the sky to give it some drama.

Stamped two pine trees at the left of the piece with Basic Black ink.

Sponged More Mustard ink on to create a shadow for the trees and for the bird.

Sponged on a little Close to Cocoa ink in the middle of the tree shadows to give a little more depth.

Added a Black card stock panel and here it is finished.
Everyone be safe and have a super pleasant and sunny day!
Until my next post. . . . . . .
Hugs,
Michelle
234 responses to “Framed Scene – Tutorial and More Blog Candy”