Tag Archives: Card Marking

Heart Stamp Tangle – Tutorial #466

As promised, I have a stamp tangle tutorial for you today.   Check it out below.  🙂

***************************************************************************

Reminder. . . . .

I have a something to give away to one of my Stampin’ Up! customers.  For the month of November, 2o11, when you place a Stampin’ Up!  order using me as your Demonstrator,  you will receive one entry toward a full set of  Stampin’ Up! Many Marvelous Markers a $109.95 value,  for each $25 increment in merchandise purchased.  Place an order for $50 and get two chances and so on and so on.

Many Marvelous Markers - by Stampin' Up!  

About the Many Marvelous Set of Markers:

 ■ Dual tipped markers: .5 mm fine point and flexible brush
■ Set of 38, packaged in rigid plastic case with handle
■ Includes colors from all 4 color collections

■ Odorless, water-based dye ink
■ Coordinate with Classic Stampin’ Pads and exclusive Stampin’ Up! card stock
■ Finger grips on cap aid in easy cap removal

I hope you can get excited about this, I am!  I cannot rave enough about these markers.   Not sure what I would do without my set.  I use them pretty much every time I create something.

I will select the winning customer on December 1, 2011 using a Random number generator.   Good Luck!

CLICK HERE SHOP AT my Stampin’ Up! web site where you can shop 24/7  for all of your Stampin’ Up! products.  Your order will be shipped directly to your door step straight from Stampin’ Up!  You will also receive a special card made by me in appreciation for your order.  My customers mean the world to me.  If you would like assistance with your order, please contact me at 937-344-1312 or e-mail me at [email protected].  I will be glad to assist you.

*****************************************************************************

Now on with the tutorial. . . . .

Supplies:

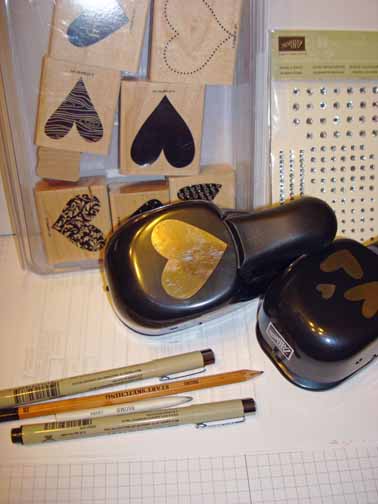
Stamps:  Stampin’ Up! I (heart) Hearts

Card stock:  Cherry Cobbler, Basic Black and Whisper White

Ink:  Stazon Jet Black

Accessories:  Stampin’ Up! heart punches, Rhinestones, Micron markers 01 & 08, number 2B pencil

Want a free copy of the brand new Stampin’ Up! Holiday Mini Catalog?  Just e-mail your address and I will get one right out to you.  Get your copy of the new 2011-2012 Stampin’ Up! Idea Book & Catalog by sending $9.95 to me at P.O. box 116, West Alexandria, Ohio 45381 or via paypal to [email protected], shipping is free.      Are you getting inspiration from this blog?   One way you can help support it is to order your Stampin’ Up products through me.   Click HEREto place an order and have your ordered delivered directly to your door step from Stampin’ Up!    Want to become a Stampin’ Up Demonstrator , receive a 20% discount on product and earn instant income on orders?  Consider being part of my Stampin’ Up Team and start your own business or become a Hobby Demo just for the discount.  Click HERE for more information.

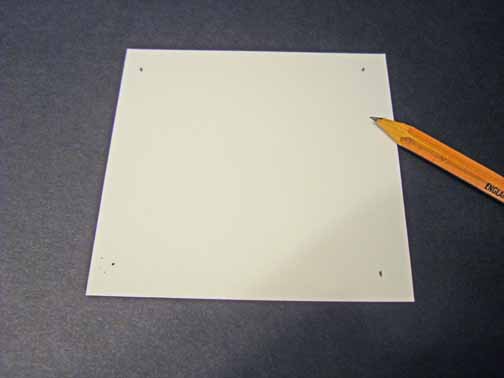
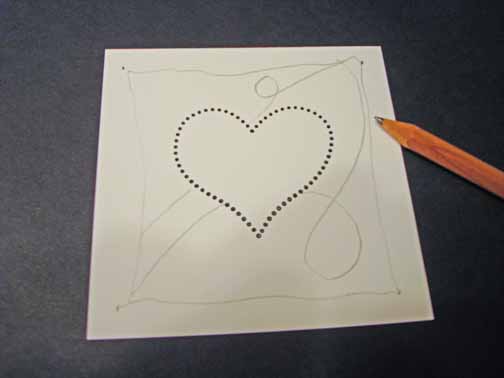
A little about how you start a Zentangle.   Take a 3.5″ Whisper White card stock square and with a pencil put a dot in each corner.

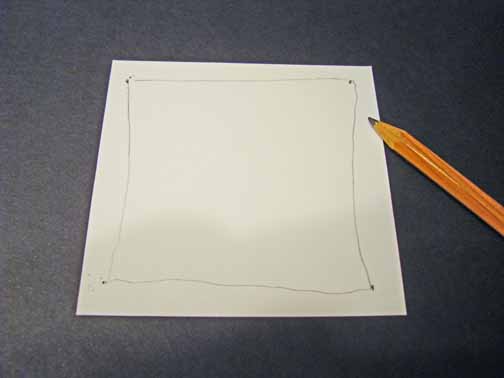
Loosely draw a line from one dot to the next.

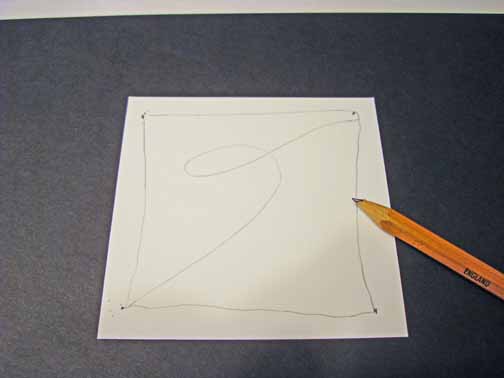
Imagine that you dropped a string on the card stock.  Now draw a string.  This could be an “X”  going across the card stock or any shape for that matter.   My string below has a simple loop.   You would then proceed to put a different tangle pattern in each section on the card stock using a black marker.

Okay, got that?  Clear as mud?

Now here is how I start my Stamp Tangle.

Stamped the heart from the Stampin’ Up! stamp set I (heart) Hearts using Stazon Jet Black ink in the middle of a 3.5″ square piece of Whisper White card stock.   I put a dot in each corner with a pencil.  Loosely drew a line from one dot to the next.   Added 2 strings with simple loops.  When I drew my strings I skipped over the heart so it would empty.  Now I’m ready to start tangling in each section.

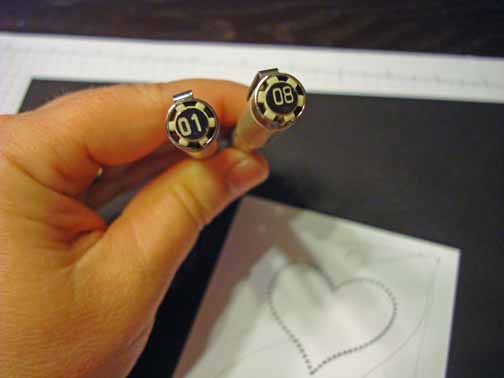
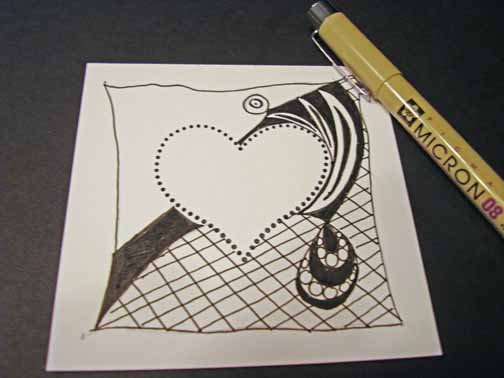
I like to work with a 01 Micron Black marker to make my tangle patterns and an 08 Micron Black marker to fill in areas and to clean the edges up of my design.  The 08 has a much larger point then the 01 which has a very small point.

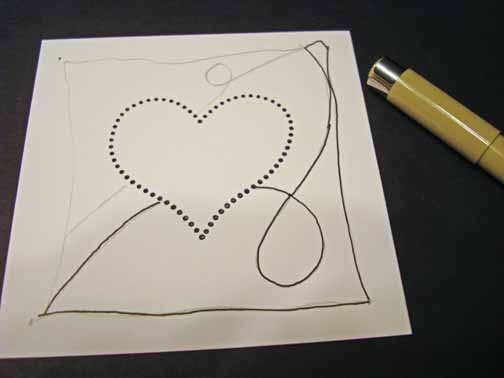
I like to outline the section that I am concentrating on.

Let me tell you there are a million tangle patterns that you can use.  Also keep in mind that you can leave a section plank or only partically fill it in.  Anything goes here.

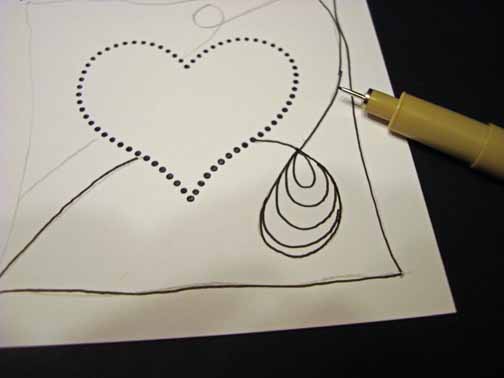
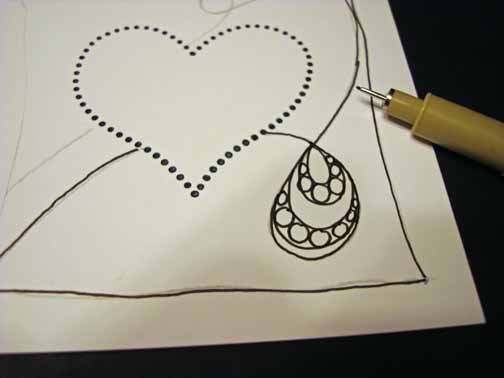
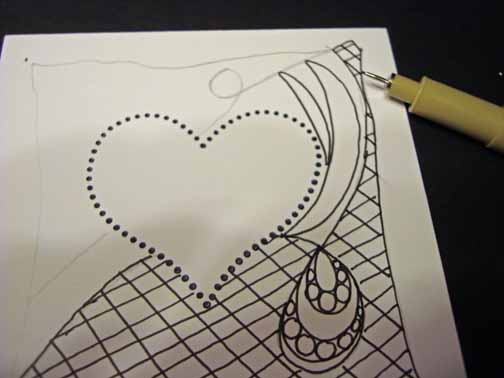
I started by putting a small tear drop in the loop and then added 3 more using the 01.

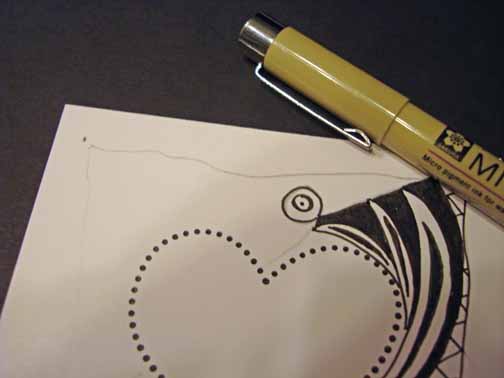
Added circles in 2 of the sections.

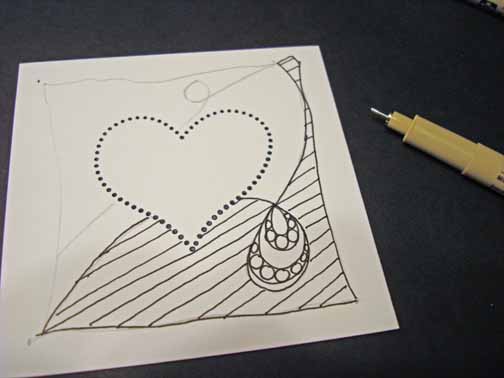
Added lines in one of the sections having them skip over the loop.

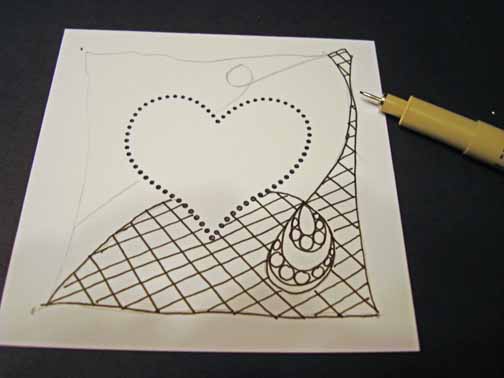
Added lines going the other direction, skipping over the loop.

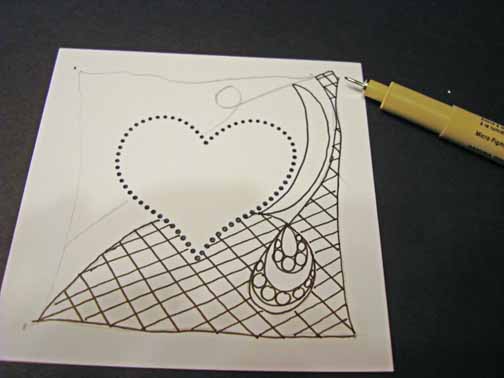
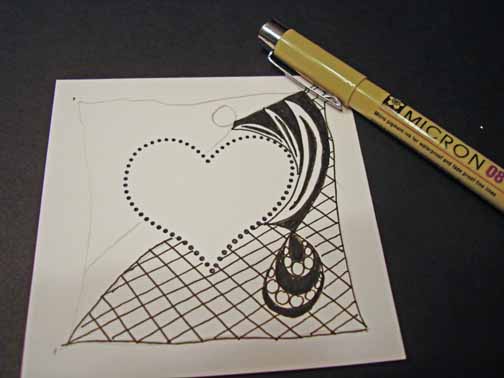
Added 3 crescent shapes in another section.  Inside of the crescents, colored in a small crescent and then filled in the background around the crescents using the 08 marker.  Also filled in 2 sections in the loop.

Filled in the other small loop with 2 circles and a dot.

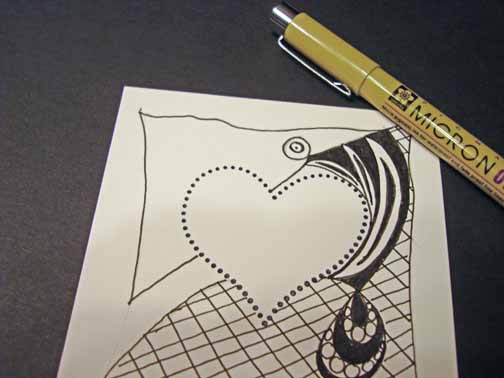
Outlined the large section at the top.

Colored in the middle section using the 08.

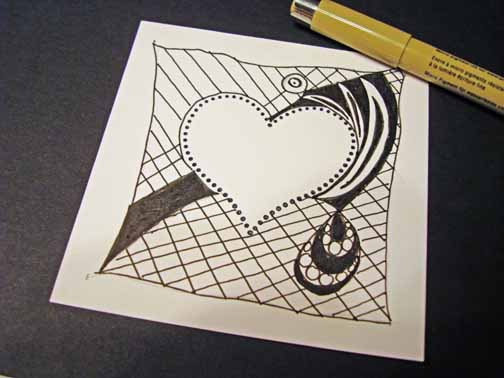
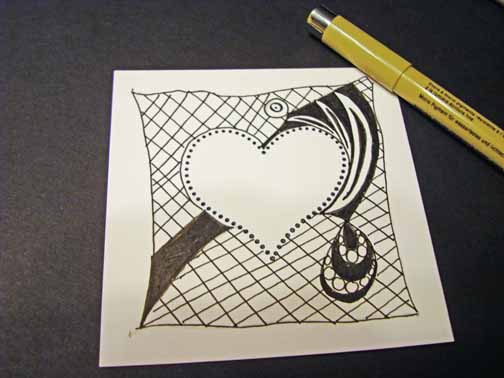
Repeated the tangle crisscross pattern that I use in the large section at the bottom of the card stock in the large section at the top of the card stock.

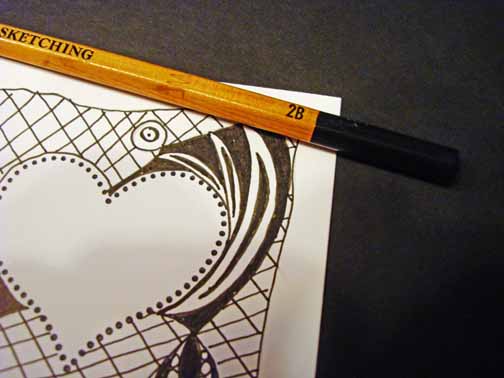
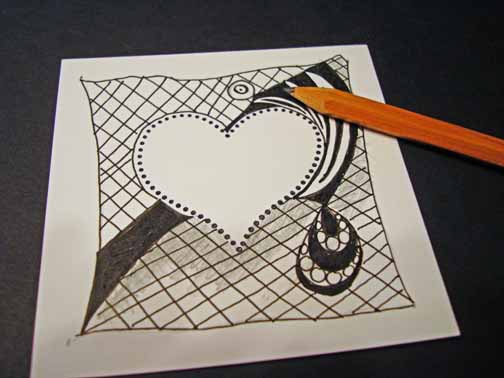
When I put in shading I like to use a 2B pencil.  The 2B stands for the softness/hardness of the lead of the pencil.   You probably remember having to have a #2 pencil in school right?   There is a range of hardness-es in art pencils.

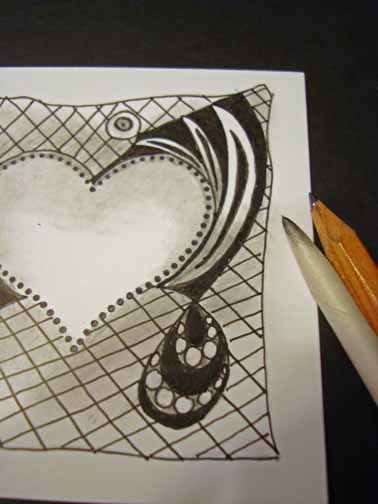
I want my heart to stand out so I am going to put shading around the outside of the heart so the background looks like it is receding.

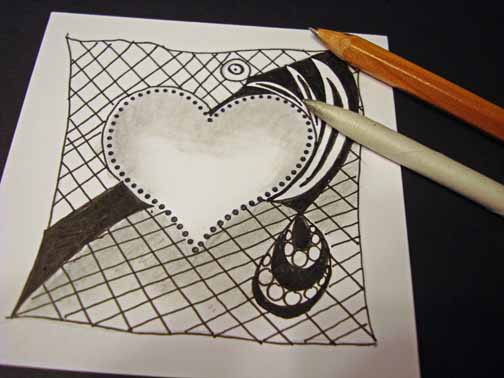
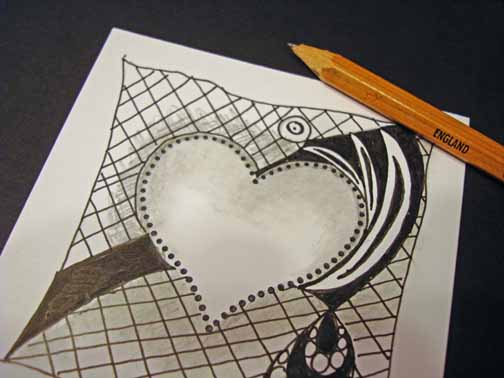
I want to give my heart some shape so I am shading the top of the heart.  To smooth out the shading I am going to use a paper stub to rub it.  This will smooth the shading so it doesn’t look as scratchy.

Added shading to recede the upper background.

Smoothed it out.  See the difference?

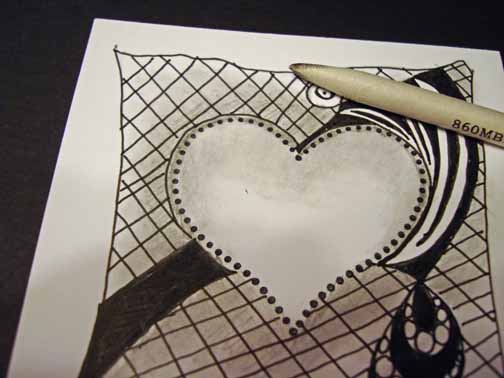
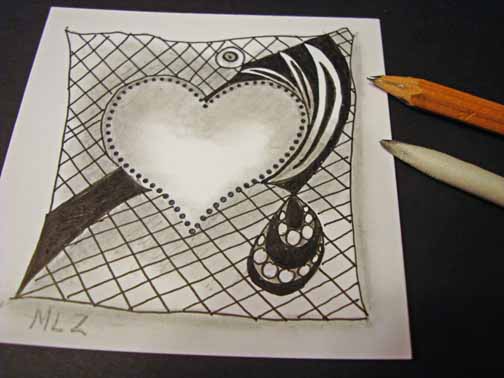
Added shading to the bottom of the crescents and around the circles in the loop so the circles stand out more.

Added shading to the right side and the bottom of my piece.   Also added my initials.  🙂  Don’t even ask me what the “L” stands for, lol.

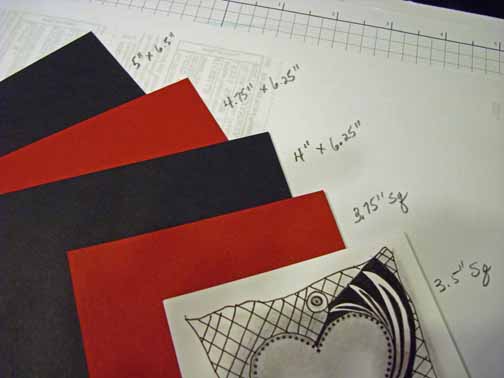
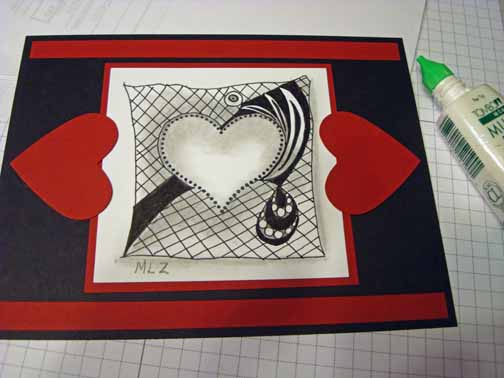
Cut 2 Basic Black card stock layers and 2 Cherry Cobbler card stock layers.  The measurments are in the photo.  🙂

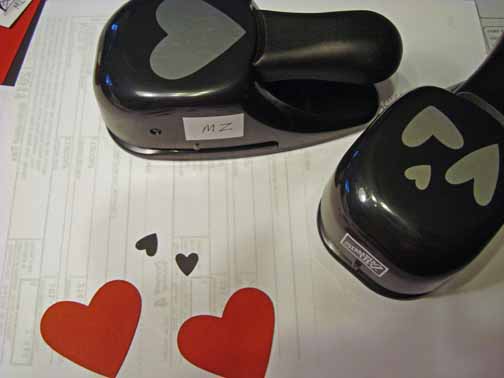
Using Stampin’ Up! heart punches, punched 2 large Cherry Cobbler hearts and 2 small Basic Black hearts.

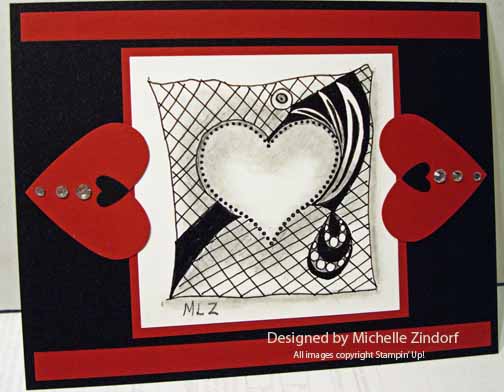
Assembled my card front.

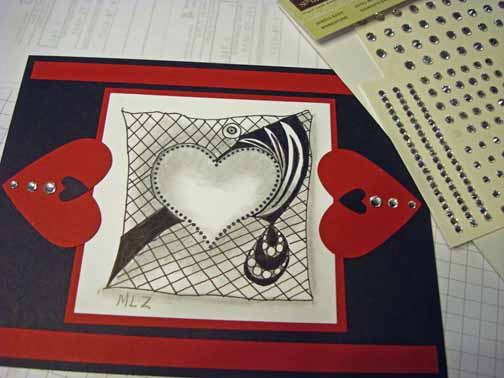
Added some bling.  Do you believe it!!!  Me using Bling!  Feel my forehead and I running a fever or what!

Here is the finished card measuring 5″ x 6.5″.   Now these stamp tangles can be any size or shape.   I’m keeping it simple for the tutorial.  🙂

I hope you enjoyed this venture into the world of stamp tangling.   I love it.  I cut multiple 3.5″ square pieces of card stock.  Stamp a different image on each one and have them in my purse with my 2 markers and my pencil and that is all I need to stamp tangle anywhere I go.   I find myself stamp tangling in restaurants, doctors offices or wherever I am that I have a few moments.  It’s also a nice thing to do in the evening when your family is watching TV.   You can be in the same room doing your own thing, lol.

Just know that you can add color to your stamp tangles.  🙂  Go ahead and go for it!

Do a google search for tangle patterns and you will be amazed at the number of tangle patterns out there.  I used just a couple very basic patterns in today’s project.

Also, don’t forget the therapeutic feeling you get from this process.   While I am stamp tangling my mind does not race.  I find myself in the moment and very relaxed.  Give it a try!

May your day be filled with exciting new adventures.

Until my next post. . . . .

Hugs,
   Get ready for Brayer and Direct to Paper Workshops!  I am coming to the following locations, click the location name for more information.    

Dayton, Ohio – Direct to Paper Workshops 

Las Vegas, Nevada    

Austin, Texas 

Seattle, Washington

 Greeneville, Tennessee 

Indianapolis, Indiana 

Indiana, Pennsylvania 

Sparta, New Jersey 

Piedmont, Alabama

Post Falls, Idaho (outside of Coeurd’Alene)

 Sand Lake, Michigan (just North of Grand Rapids)

Lawrence, Kansas 

Elizabethtown, Kentucky

West Bend, Wisconsin 

Longmont (Gunbarrel), Colorado 

Orange, Massachusetts

Sacramento, California

Staley, North Carolina

 
Here is a link to my workshop calendar where you can see all of my travel schedule and to get info on beginner and advanced Brayer workshops, along with the newly added Direct to Paper Workshop: https://zindorf.splitcoaststampers.com/workshop-calendar        
 

Don’t see a workshop in your State?  Interested in hosting the workshops in your area   Click HERE to get hostess information.       
 

Link to my Stampin’ Up website where you can order all of your must have Stampin’ Up products from me 24-7:  https://michellezindorf.stampinup.net

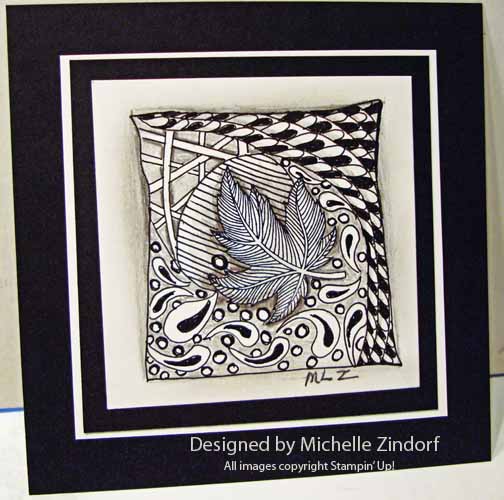
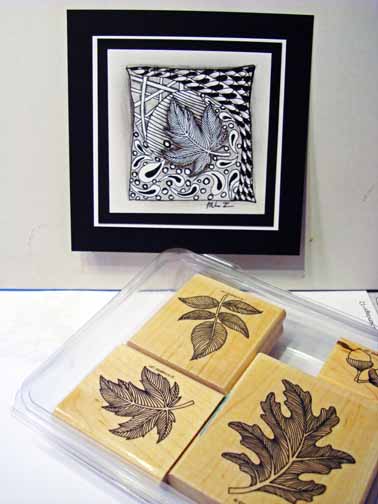
Autumn Leaf Stamp Tangle

Hi There,

I’m busy packing for my next travel location.  I will be heading to Lincoln, Illinois to teach my brayer techniques to some fabulous students, woohooo!  I love an adventure, don’t you?

Before I leave I wanted to pose a question for you.  Do you know what Zentangle is?    Zentangle is something I find myself doing when I’m a bit stressed or just want to calm my mind.  Zentangle is a relaxing process that turns drawing simple patterns into artistic design.  Plus you get the mental health benefits, love that.   Here is a link to the Zentangle Creator’s website if you would like more info on Zentangling, CLICK HERE.

Now, you know how much I love rubber stamping and I’m guessing that you do too if you are reading my blog.   Well I have been playing around with using stamping in the Zentangle process.  I call it Stamp Tangle.

Would you like to know how this is done?  Maybe see some tutorials?  If so, let me hear from you in my comment section below.  If you are getting this via e-mail and want to comment, please CLICK HERE  and then leave a comment at the bottom of the actual blog post.

If there is some interest I will create some Stamp Tangle things to share with you on this blog.

It’s a wonderful process.  I think you will love it.

May you have an inner peace filled weekend.

Until my next post. . . . .

Hugs,

   Get ready for Brayer Workshops!  I am coming to the following locations, click the location name for more information.    

Lincoln, Illinois    

Dayton, Ohio – Direct to Paper Workshops 

Las Vegas, Nevada    

Austin, Texas 

Seattle, Washington

 Greeneville, Tennessee 

Indianapolis, Indiana 

Indiana, Pennsylvania 

Sparta, New Jersey 

Piedmont, Alabama

Post Falls, Idaho (outside of Coeurd’Alene)

 Sand Lake, Michigan (just North of Grand Rapids)

Lawrence, Kansas 

Elizabethtown, Kentucky

West Bend, Wisconsin 

Longmont (Gunbarrel), Colorado 

Orange, Massachusetts

Sacramento, California

Staley, North Carolina

 
Here is a link to my workshop calendar where you can see all of my travel schedule and to get info on beginner and advanced Brayer workshops, along with the newly added Direct to Paper Workshop: https://zindorf.splitcoaststampers.com/workshop-calendar        
 

Don’t see a workshop in your State?  Interested in hosting the workshops in your area   Click HERE to get hostess information.       
 

Link to my Stampin’ Up website where you can order all of your must have Stampin’ Up products from me 24-7:  https://michellezindorf.stampinup

Two Bucks – Tutorial #364

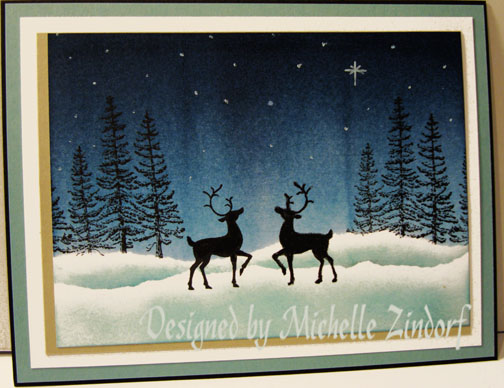
I have a winter scene for you today.  Just in case you want to start those Christmas cards.   What could be better than a couple of deer in the snow, right? 

Today’s tutorial shows how to create hills of snow and then a reverse image. 

I’m a bit slow at posting right now, the blog administrators upgraded my blog and now I have to learn how to post again.  It is all so very different behind the scenes, Yikes!   I do want to thank the people at Split Coast Stampers.  They do such a terrific job keeping my blog up and running when I have problems, they Rock!

Now on with tutorial #364.

Supplies:

Stamps: Stampin’ Up! Winter Post and Plant Hope
Paper: Stampin’ Up! Whisper White, Sahara Sand, Baja Breeze and Basic Black
Ink: Stampin’ Up! Basic Black, Not Quite Navy, Night of Navy and Baja Breeze
Accessories: Stampin’ Up! Sponge, White Gel Pen, Basic Black marker, Stamp-a-ma-jig, Brayer and ruler

 The brand new USA Idea book and Catalog is here.   For your copy, please send a check for $9.95 to Michelle Zindorf, P.O. Box 116, West Alexandria, OH 45381 or send it via paypal to [email protected] USA only.     Want a copy of the new Holiday Mini Catalog ?  E-mail your mailing address to [email protected] and I will get one in the mail to you.  )  Are you getting inspiration from this blog?   One way you can help support it is to order your Stampin’ Up products through me.   Click HERE to place an order.    Want to become a Stampin’ Up Demonstrator , receive a 20% discount on product and earn instant income on orders?  Consider being part of my Stampin’ Up Team and start your own business or become a Hobby Demo just for the discount.  Click HERE for more information.

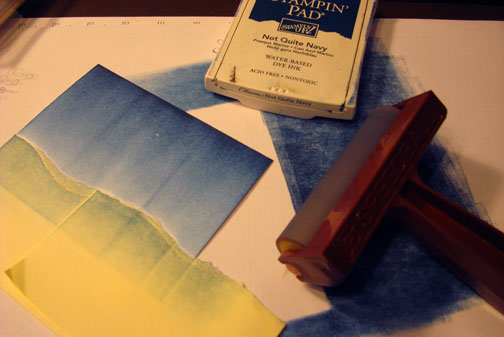
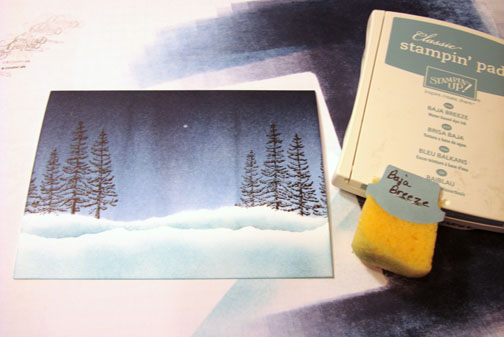
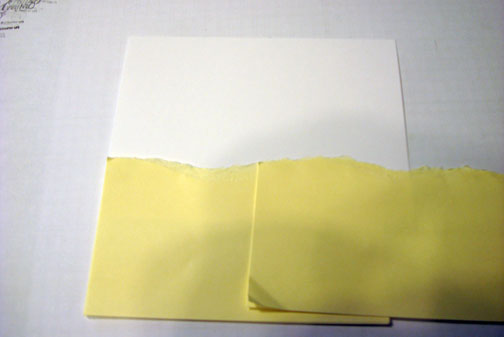
Ripped a couple of post it notes and masked the bottom of  a 4″ x 5.5″ piece of Whisper White card stock (Snow area). 

Brayered Not Quite Navy ink in the sky area.  Also brayered Night of Navy at the top of the card stock.

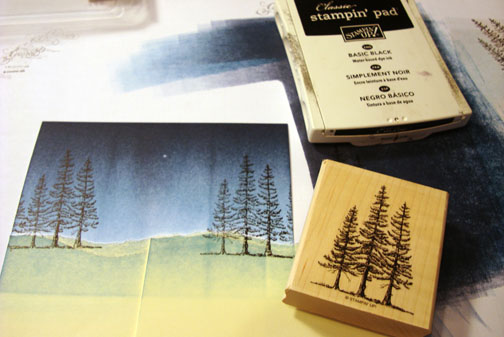
Stamped the Pine trees from the Stampin’ Up set Plant Hope using Basic Black ink.

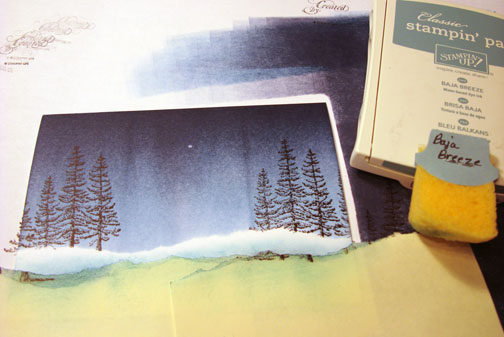
Repositioned the post it note mask to show some of the snow area above it.  Sponged Baja Breeze ink at the post it note edge.

Removed the post it note mask and sponged Baja Breeze ink at the bottom of the card stock.

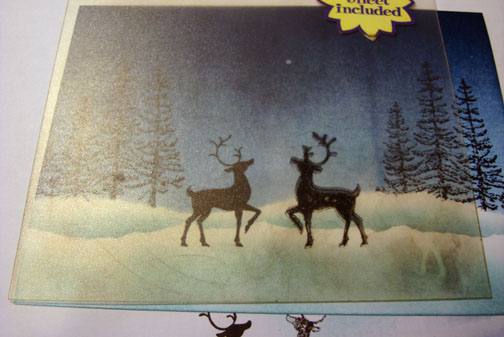
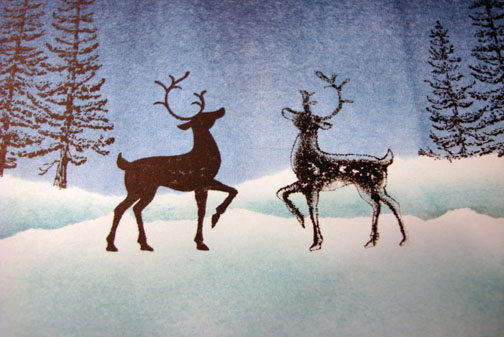
Stamped the Deer from the Stampin’ Up set Winter post on the card stock using Basic Black ink.  Stamped the deer again on a Stamp-a-ma-jig plastic using Basic Black ink and flipped it over onto the card stock and rubbed the back of the plastic to transfer the image. 

The reverse image will come out faint. 

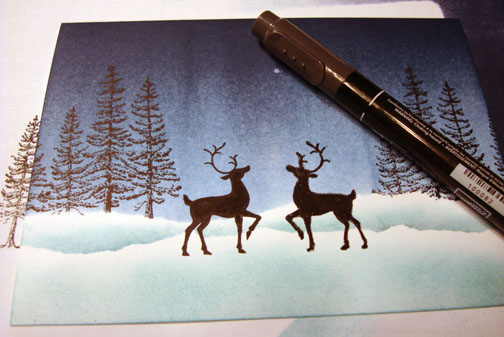
Colored in the reverse image using a Basic Black marker.

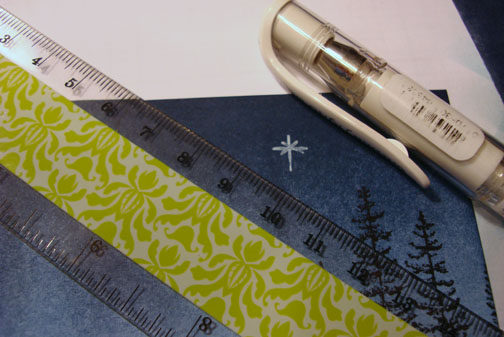
Added a star in the sky by making a cross and then an “x” over it using a ruler and a White gel pen.

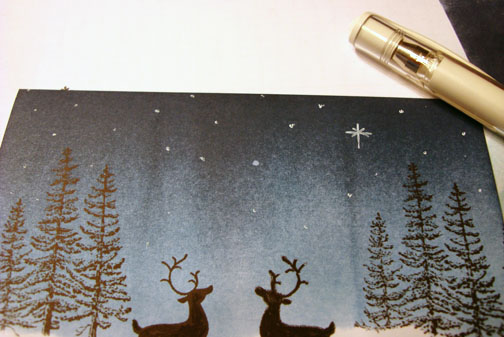
Added random dots of White Gel pen in the sky area.

Added a panel of Sahara Sand so it showed only at the bottom and left side of the main image panel.

Added Whisper White, Baja Breeze and Basic Black panels.

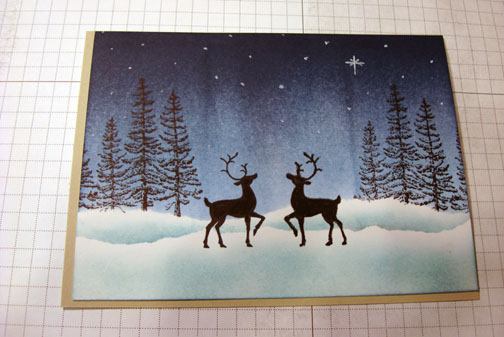
Here is the finished card measuring 5″ x 6.5″.

I hope your day is much warmer than this scene.

Until my next post. . . . .  . .

Hugs,

Michelle

 dsc04164-2.jpg  Get ready for Brayer Workshops!  I am coming to the following locations, click the location name for more information.

Auburn, Washington (near Seattle)

Elk Grove Village, Illinois

Savannah, Georgia

Atlanta, Georgia

Milton, West Virginia

Soledad, California

Columbus, Ohio

Fayette, Tennessee near Nashville, TN & Huntsville, AL

Tucson, Arizona

Virginia Beach, Virginia

Houston, Texas

Wichita, Kansas

Syracuse (Bridgeport), New York

St. Peters, Missouri

La Porte, Indiana

Orlando (Davenport), Florida

St. Cloud, Minnesota

Colorado Springs, Colorado

Cleveland (Euclid), Ohio

Here is a link to my workshop calendar where you can see all of my travel schedule and to get info on beginner and advanced Brayer workshops:   https://zindorf.splitcoaststampers.com/workshop-calendar 

Don’t see a workshop in your State?  Interested in hosting the workshops in your area?   Click HERE to get hostess information.

Link to my Stampin’ Up website where you can order all of your must have Stampin’ Up products from me 24-7:  https://michellezindorf.stampinup.net
Frequently asked questions answers:  https://zindorf.splitcoaststampers.com/frequently-asked-questions/

On the Bench – Tutorial #225

dsc09687.JPG

Good Morning, Good Morning, Good Morning!  I finally feel like I could catch my breath this morning and slooooowwww down to create a little something at a leisurely pace.    Sometimes the world just seems like it is going 100 miles an hour.   I try not to get caught up in the race, but it sneaks in sometimes anyway, lol.  We moved to the country 4 years ago to step back from things a bit and enjoy the slower pace.  I forget that now and then.

This mornings project hopefully reflects a peaceful scene, that was my intention anyway.

Let’s get started. . . . 🙂

Supplies:

Stamps: Stampin’ Up “Scene in the Garden” & “Branch Out”
Paper: Stampin’ Up Old Olive Designer Paper, Whisper White & Basic Black card stock
Ink: Stampin’ Up Basic Black, Sahara Sand, Old Olive, Always Artichoke & Close to Cocoa
Accessories: Versamark marker & pad, Stampin’ Up Markers, Old Olive Brads, Black Gingham Ribbon, White Gel Pen, Stamp-A-Ma-Jig, Post it Note, Clear embossing powder, Heat Gun, Sponge

Are you inspired by this Blog?  One way you can help support this blog is by ordering your Stampin’ Up products through me.   You can order from me 24-7 from this link:  https://michellezindorf.stampinup.net or e-mail me at [email protected] if you are within the United States.  Want a copy of the current mini catalog, just e-mail me your address and I will pop one in the mail to you.  Want to become a Stampin’ Up Demonstrator and earn instant income?  Consider being part of my Stampin’ Up Team.

dsc09690.JPG

On a 3.5″ x 4.25″ piece of Whisper White card stock stamped the bench with Close to Cocoa ink.

dsc09657.JPG

Now this is what happens to your photographs when you accidentally hit the wrong button on your camera, your pictures go out of focus and you don’t realize it until you start to edit them.  🙂

So there are no in focus photos for a few of these next steps, but I will walk you through it.

Colored the bench with a Creamy Caramel marker.

Colored the shadow areas on the legs of the bench with a Close to Cocoa marker.

Colored over the bench legs again to blend the shading with the Creamy Caramel Marker.

Colored over the bench with a Versamark marker and heat embossed the image with clear embossing powder and a heat gun.

dsc09658.JPG

Stamped the boots with Basic Black ink using a Stamp-a-ma-jig for placement.

dsc09663.JPG

Now we are back in focus, lol.

Colored the middle boots with an Old Olive marker.

dsc09665.JPG

Added Always Artichoke marker to the boots.

dsc09666.JPG

Colored the boots on the left with an Apricot Appeal marker.

dsc09667.JPG

Added More Mustard marker to the boots.

dsc09668.JPG

Colored the boots on the right side with a Rose Red Marker.

dsc09669.JPG

Added Bravo Burgundy marker to the boots.

dsc09670.JPG

Colored over the boots with a Versamark marker and heat embossed them using clear embossing powder and a heat gun.

dsc09671.JPG

dsc09672.JPG

Created a clap board wall behind the bench by using a post it note to mask and sponge at the edge of the post it note with Sahara Sand ink.  Moved the mask and repeated sponging over and over until my wall was built.  🙂

dsc09673.JPG

dsc09674.JPG

Sponged in the ground with Old Olive ink.

dsc09676.JPG

Added Always Artichoke ink with a sponge at the bottom of the card stock.

dsc09677.JPG

Stamped the tree leaves by first loading the stamp with Versamark and then with Old Olive ink before stamping.  Heat embossed the image using clear embossing powder and a heat gun.

dsc09678.JPG 

dsc09679.JPG

Stamped the tree over the leaves using Close to Cocoa ink, omitting the grassy section of the stamp by not inking it.  Extended the trunk of the tree at the bottom using a Close to Cocoa marker.

dsc09680.JPG

Sponged a bit of Old Olive ink in the leaf area of the tree.

dsc09681.JPG

Added a bit of shadow in the middle of the tree by sponging in Always Artichoke ink.

dsc09682.JPG

Added a few dots of White Gel pen to the tree.

dsc09683.JPG

Assembled and added Black Gingham ribbon and Old Olive Brads.

dsc09684.JPG

Here it is finished measuring 5.25″ square.

dsc09687.JPG

I hope this tutorial has inspired you to create a peaceful scene of your own, either in real life or on paper.

Until my next post. . . . . . . . . . . . . . . . . 

Huge Hugs,

Michelle

dsc04276.jpg  Get ready for Brayer Workshops!  I am coming to:

Dayton, Ohio

Webster, New York

New Johnsonville, Tennessee

Stoughton, Wisconsin

Columbia, Missouri

Lynchburg, Virginia

Greenwood, Indiana

Castro Valley, California

Yardley, Pennsylvania (near Philadelphia)

Knox, Maine

Broomfield, Colorado

Moore, Oklahoma

Nashville, Indiana

Portland, Michigan

2010

Phoenix, Arizona

Monroe, Louisiana

Jacksonville, Florida

Mechanicsville, Virginia

Raleigh, North Carolina

Colleyville, Texas

Colorado Springs, Colorado

Salem, Oregon

Here is a link to my workshop calendar where you can see all of my travel schedule and to get info on beginner and advanced Brayer workshops:  https://zindorf.splitcoaststampers.com/workshop-calendar

Link to my Stampin’ Up website were you can order all of your must have Stampin’ Up products from me 24-7:  https://michellezindorf.stampinup.net

Frequently asked questions answers:  https://zindorf.splitcoaststampers.com/frequently-asked-questions/

Thinking – Tutorial #164

dsc07317.JPG

I’m in the mood again for a little coloring fun with my Prismacolor Markers.  Coloring really relaxes me.  I can just while away the hours playing with markers.  Today’s tutorial also has a reverse image in it.  You can do a reverse image in quite a few different ways.  I used a reverse image stamp by Rubber Stampeded to create my reverse image.

Let’s get started.  🙂
Supplies:

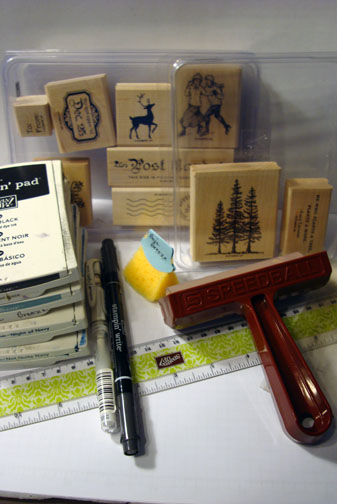
Stamps: Stampin’ Up “Summer by The Sea” & “Embrace Life”, Rubber Stampeded “Reverse Image Stamp”
Paper: Stampin’ Up Whisper White, Kiwi Kiss & Baja Breeze
Ink: Stampin’ Up Baja Breeze & Kiwi Kiss, Palette Hybrid Noir Black
Accessories: Prismacolor Markers, Brayer, Fine Detail Embossing Powder, Heat Gun, Versamark Marker, White Gel Pen, Aqua Painter
dsc07322.JPG

Stamped onto my reverse image stamp with Palette Noir Black ink and then stamped the reverse image stamp onto my Whisper White card stock. 

I like to start out stamping my reverse image first.  It’s easier for me to line the original image up with the reversed one instead of lining the reversed image up with the original one.

dsc07292.JPG

Stamped the Original image right side up with Palette Noir Black ink having the feet of the two images meet.

I used Palette Noir Black  Hybrid ink because it won’t smear as much with solvent based coloring mediums, such as Prismacolor markers.

dsc07293.JPG

Colored the images pants with Cloud Blue Prismacolor Marker.

dsc07295.JPG

Added Teal Blue to the pants.

dsc07296.JPG

Colored over the pants again with the Cloud Blue to blend  the colors together.

dsc07297.JPG

Colored the Shirts, hats and rim of boats with Eggshell.

dsc07298.JPG

Added Burnt Ochre to the shirts.

dsc07299.JPG

Blended the Burnt Ochre in with the Eggshell marker.

dsc07300.JPG

Added a bit of dark to the shirt creases with a Sienna Brown Marker.

dsc07301.JPG

Added Cloud Blue to the band of the hats.

dsc07302.JPG

Went over the shadow parts of the hats with the eggshell marker again.

Tip you can add shadow by using the same color of marker over itself, just let it dry a bit between colorings.

dsc07303.JPG

Added a bit of Sienna Brown to the hats.

dsc07304.JPG

Colored the boat with Cold Stone marker.

dsc07305.JPG

Added Teal Blue to the bottom of the boats.

dsc07306.JPG

Went over the boat again with Cold Stone marker to blend the colors together.

dsc07307.JPG

Colored the skin in the two images with Buff marker.

dsc07308.JPG

Colored over the original image with a Versamark marker and heat embossed it using fine detail clear embossing powder and a heat gun.

Note:  I did not use Versmark on or emboss the reverse image.

dsc07309.JPG

dsc07310.JPG

Brayered Baja Breeze ink at the bottom and very top of the card stock.

dsc07311.JPG

dsc07312.JPG

Highlighted the ripples in the water with a White Gel pen.

dsc07313.JPG

Yikes!  I missed a photo here.  I brayered Kiwi Kiss at the bottom of the card stock not covering the Baja Breeze ink entirely.

Assembled card front with a couple of simple panels.

Stamped the Weed from the Embrace Life set over all the panels.

dsc07314.JPG

Used my Aqua Painter and Kiwi Kiss ink to color in the leaves of the weeds.

Note:  If you squeeze an ink pad when it closed, pressing the lid down onto the ink pad it will make a puddle of ink on the lid.  You can use the puddle of  ink to watercolor with.

dsc07315.JPG

Here is the completed card measuring 5″ x 6.5″.

dsc07317.JPG

May your day be filled with great reflection.

Until my next post. . . . . . . . . .

Hugs,

Michelle

Links to all my tutorials can be found here:  https://zindorf.splitcoaststampers.com/tutorials-ive-written/

Here is a link to my workshop calendar if you want to get info on beginner and advanced Brayer workshops:  https://zindorf.splitcoaststampers.com/workshop-calendar

Frequently asked questions answers:  https://zindorf.splitcoaststampers.com/frequently-asked-questions/