
Hello out there! Hope everyone is having a fabulous holiday weekend. I took the day off yesterday and spent some quality time with family. Today I am going to spend the whole day stamping. Woohoo! This project I can share with you, but the rest of my stamping today will be projects that will only be unveiled in my advanced brayer workshops. Actually, I will be spending the week putting them together. I always want my workshop projects to be over the top. 🙂
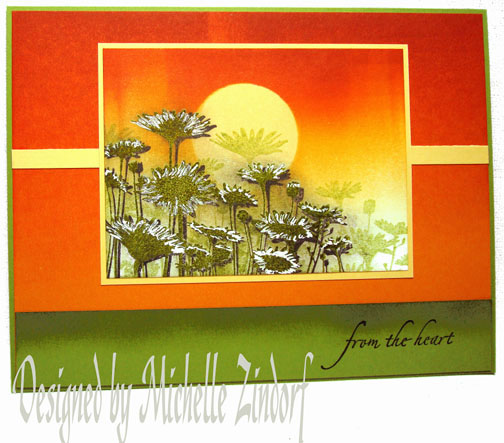
A little about today’s tutorial, I added some white gel pen and some over stamping to create depth in this piece. What do you think? Did it work?
TIMES UP – A WINNER HAS BEEN NAMED
I have decided to give this card away as blog candy tomorrow. So leave a comment telling me to enter you and I will use a random number generator to select the winner. If you are receiving this blog update via e-mail, please click this link and then leave a comment:
https://zindorf.splitcoaststampers.com/2009/05/25/depth-in-daisies-tutorial-214/
On with the tutorial. . . . .
Supplies:
| Stamps: Stampin’ Up Upsy Daisy & Holdays & Wishes |
| Paper: Stampin’ Up Whisper White, Apricot Appeal, Old Olive & Pumpkin Pie |
| Ink: Stampin’ Up Basic Black, Old Olive, Pumpkin Pie, Apricot Appeal & Ruby Red |
| Accessories: Stampin’ UP 1 3/8″ Circle Punch, Post it note, Sponge, White Gel Pen, Brayer, Versamark Pad, Clear embossing powder, heat gun |
Are you inspired by this Blog? One way for you can help support this blog is by ordering your Stampin’ Up products through me. You can order from me 24-7 from this link: https://michellezindorf.stampinup.net or e-mail me at [email protected] if you are within the United States. Want a copy of the current mini catalog, just e-mail me your address and I will pop one in the mail to you.
Want to become a Stampin’ Up Demonstrator and earn instant income? Consider being part of my Stampin’ Up Team.

Stamped the Upsy Daisy Silhouette stamp on a 3″ x 4″ piece of Whisper White Card stock by first loading the stamp with Versamark and then Old Olive ink before stamping it.

Heat embossed the image using clear embossing powder and a heat gun.

Brayered Apricot Appeal ink at the top of the card stock.

Used a 1 3/8″ circle punch and punched a mask out of the sticky part of a Post It Note. Put the mask on my card stock. Brayered Pumpkin Pie ink at the top of the card stock, not covering the Apricot Appeal ink entirely.

Brayred Ruby Red ink at the very top of the card stock, not covering the Pumpkin Pie ink entirely.

Removed the mask and Over stamped the Daisies with Basic Black ink.

I know not to do this from past experience, but I always end up doing it anyway.
I wiped my black ink off of my embossed images using a circular motion with an old towel, smearing the ink.
What I should have done was pat it off of the emboss images. Oh well, I will get it right one of these days, lol.

Over stamped the embossed images with Old Olive ink, stamping off once on my scrap paper. (Second Generation stamping)

Patted the Old Olive ink off of my embossed images with a cotton towel. 🙂

Used a White Gel Pen to added petals to the embossed Silhouette. Used a heat gun to set the white gel pen into the embossing.


Brayered Ruby Red ink at the top of a Pumpkin Pie Panel.

Sponged Old Olive ink on a 1″ strip of Old Olive card stock.

Assembled card front and added a sentiment with Black ink on the bottom of the card front.

Here is the finished card measuring 5″ x 6.5″.
I hope this tutorial has inspired you to use over stamping in your project today to create depth in your scene.
Have a safe and happy holiday.
Until my next post. . . . . . . . . . . . . . .
Hugs,
Michelle
 Get ready for Brayer Workshops! I am coming to:
Dayton, Ohio
Buffalo, Minnesota
Webster, New York
New Johnsonville, Tennessee
Stoughton, Wisconsin
Columbia, Missouri
Lynchburg, Virginia
Greewood, Indiana
Castro Valley, California
Yardley, Pennsylvania (near Philadelphia)
Knox, Maine
Broomfield, Colorado
Moore, Oklahoma
Portland, Michigan
2010
Jacksonville, Florida
Pocatello, Idaho
Salem, Oregon
Here is a link to my workshop calendar where you can see all of my travel schedule and to get info on beginner and advanced Brayer workshops: https://zindorf.splitcoaststampers.com/workshop-calendar
Link to my Stampin’ Up website were you can order all of your must have Stampin’ Up products from me 24-7: https://michellezindorf.stampinup.net
Here is a link to all of my tutorials: https://zindorf.splitcoaststampers.com/tutorials-ive-written/
Frequently asked questions answers: https://zindorf.splitcoaststampers.com/frequently-asked-questions/
176 responses to “Depth in Daisies – Tutorial #214 and Card Give-A-Way”