Supplies:
| Stamps: Stampin’ Up Lovely as a Tree |
| Paper: Stampin’ Up Old Olive, Whisper White & Basic Black |
| Ink: Distress Ink Tattered Rose, Old Paper, Frayed Burlap, Dried Marigold, Peeled Paint, Black Soot, Aged Mahogany, Adirondack Pesto |
| Accessories: Big Shot and Top Note Die, Brads, Sponge, Chocolate Chip marker, White Gel Pen, Black Marker |
I will start out with an assortment of Distress pads and a 4″ x 5.25″ piece of Whisper White Card stock.
Here is a shot of one of the distress ink pads. See how the pad is raised above the plastic base. You can use the raised pad edge to smear/streak the color on your card stock.
Using the Old Paper distress pad edge, smeared the ink on the bottom of the card stock.
Using the corner of the Frayed Burlap Distress ink pad, smeared a bit of ink on.
Used the edge of the Aged Mahogany Distress ink pad with a half of circle motion to create a bit of grasses on the card stock.
Used the edge of the Peeled Paint Distress pad and created a streak of ground in the middle of the scene.
Used the edge of the Aged Mahogany pad and smeared ink from the left side of the sky to the right side.
Tapped the edge of the Black Soot Distress Ink pad along the horizon line randomly to create some interest in the distance.
Stamped the Oak Tree with Black Soot Distress Ink.
Colored in the trunk with a Stampin’ Up Chocolate Chip marker.
Sponged Adirondack Pesto Ink on the lower leaf area of the tree.
Sponged Peeled Paint Distress ink on the upper leaf area of the tree.
The sky area looked a little bland so I used the edge of the Tattered Rose Distress pad and smeared the ink from Left to Right across the sky area.
Added a bit of Dried Marigold Distress ink in the sky area using the edge of the ink pad.
That’s a little better. 🙂
My tree was fading a bit in the back ground so I added some dots on the left side of the tree leaf area and outlined the left side of the trunk with a White Gel Pen.
Used a black marker to outline the right side of the tree and added some dots on the right side of leaf area.
Used my new Big Shot Die Cut machine and the Top Note Die to create my mat for my scene out of a 4″ x 5.25″ piece of Whisper White card stock.
I used the negative piece and layered it on top of my main image panel.
Sponged Peeled Paint Distress Ink on the right and left side of the white panel.
Cut an 4 7/8″ x 6 3/8″ piece of Old Olive Card stock and sponged Pesto ink at the corners of it.
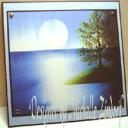
Assembled my card and here it is finished measuring 5″ x 6.5″.
I hope this tutorial has inspired you to get out your ink pads and smear some ink on something. 🙂
May your Wednesday be filled with Spring breezes and sunshine.
Until my next post. . . . . . . . . .
Hugs,
Michelle Zindorf
Get ready for Brayer Workshops! I am coming to:
Wheaton, Illinois
Fort Smith, Arkansas
Dayton, Ohio
Savannah, Georgia
Covington, Indiana
Buffalo, Minnesota
Webster, New York
Stoughton, Wisconsin
Castro Valley, California
Yardley, Pennsylvania (near Philadelphia)
Knox, Maine
Broomfield, Colorado
Lynchburg, Virginia
Columbia, Missouri
Here is a link to my workshop calendar where you can see all of my travel schedule and to get info on beginner and advanced Brayer workshops: https://zindorf.splitcoaststampers.com/workshop-calendar
Link to my Stampin’ Up website were you can order all of your must have Stampin’ Up products from me 24-7: https://michellezindorf.stampinup.net
Here is a link to all of my tutorials: https://zindorf.splitcoaststampers.com/tutorials-ive-written/
Frequently asked questions answers: https://zindorf.splitcoaststampers.com/frequently-asked-questions/


Pingback: Direct to Paper Scene - Tutorial #187 | Tutorials | Scrapbook Faves