Announcement, Announcement! I will be teaching brayer workshops in the following towns:
Dayton, Ohio at Marco Paper Store (https://www.marcopaper.com/) on September 6th
Fort Collins, Colorado on September 19th & 20th
San Jose, California on October 24th & 25th
For information on these workshops or to host one in your town, please contact Lisa Itatani at [email protected] or https://flatfishpaperarts.blogspot.com/ while there are still spots open. 🙂
Come join me and let’s take the frustration out of using that brayer an create some dramatic skies together in the process. 🙂 Hope to see you soon.
Now on to today’s tutorial. 🙂
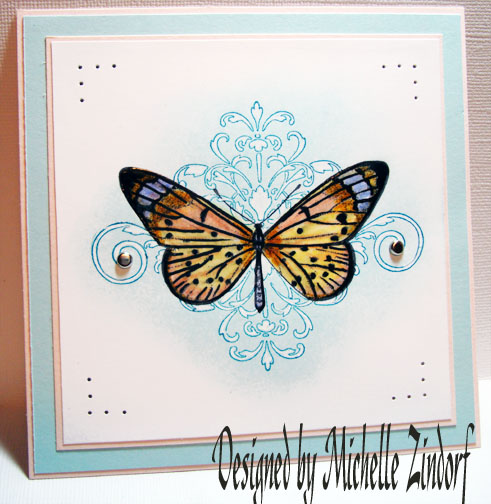
Today’s project shows off the emboss resist technique. Also, I thought I would celebrate the butterfly while they are still fluttering around in my yard.
Supplies:
| Stamps: Stampin’ Up Kind Thoughts & Wonderful Wings |
| Paper: Stampin’ Up Whisper White, Soft Sky and Blush Blossom |
| Ink: Adirondack Stream & Aqua, Palette Noir Black |
| Accessories: Stampin’ Up markers More Mustard, Blush Blossom, Barely Banana, Almost Amethyst, Faber-Castell Black marker, Piercing Tools, Silver Brads, Versamark Marker and Pad, Sponge, Stamp-a-ma-Jig, Clear embossing Powder and Heat gun |
Stamped butterfly with Palette Noir Black ink on a 4.5″ x 4.5″ piece of Whisper White card stock.
Colored the part of the Butterfly’s wings and the body with an Almost Amethyst marker.
Colored a part of the Butterfly’s wings with a Blush Blossom marker.
Colored part of the Butterfly’s wings with a Barely Banana Marker.
Colored part of the butterfly’s wings with a More Mustard marker.
Darkened the black lines on the butterfly with a Faber Castell black marker to make the butterfly really pop!
Colored over the entire butterfly, being very careful to stay within the design area, with a Versamark marker.
Heat embossed the butterfly with clear embossing powder and a heat gun.
Using a Stamp-a-ma-jig for placement, stamped the flourish by first loading it with Versamark and then with Stream ink before stamping.
Heat embossed flourish with clear embossing powder.
Note: it was not necessary to clean the stream ink off of the butterfly, it just melts right into the embossing on the butterfly when heated.
Sponged Aqua ink onto the flourish area in a circular motion.
Colored in the flourish with a white gel pen to make it stand out.
After assembling card front, used piercing tools and pierced each corner of of the main image panel.
Added a silver brad to each side of the flourish.
Here you have it the finished card measuring 5.25″ x 5.25″.
Hope you enjoyed today’s tutorial and will give emboss resist a try. 🙂
May your day be filled with filtered light and colorful butterflies.
Until my next post. . . . . . . . . . .
Hugs,
Michelle


40 responses to “Flourish Butterfly – Tutorial”