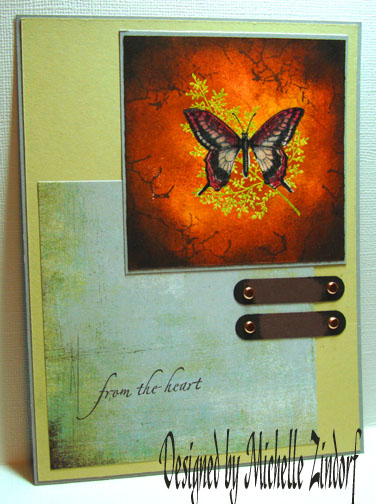
This was created using the sketch challenge from Split Coast Stampers SC176. These sketch challenges really get my mind racing. Here is the link if you would like to play along too:
https://www.splitcoaststampers.com/forums/showthread.php?t=347754
Supplies:
| Stamps: Stampin’ Up Touch of Nature & Holidays & Wishes, Stampendous Marble Texture Cube |
| Paper: Stampin’ Up Whisper White, River Rock & Going Gray, Basic Grey DP Archaic |
| Ink: Stampin’ Up Black, Adirondack Lettuce, Butterscotch, Ginger, Mountain Rose & Espresso, Palette Noir Black |
| Accessories: Versamark Marker & Pad, Clear embossing powder & heat gun, Prismacolor markers Magenta, Blush Pink, Buff & Deco Peach, Sponges, Brads, Window Punch |
Stamped Butterfly with Palette Noir Black ink on Whisper White card stock.
Colored the butterfly wings in with a Prismacolor Deco Peach marker.
Colored the tops and bottom of the wings with a Prismacolor Blush Pink marker.
Colored the very tops and bottom of the wings with a Prismacolor Magenta marker.
Colored the butterfly’s body in with a Prismacolor Buff marker.
The black in the butterfly’s wings was look dual so I darkened them with a black marker.
Being careful to stay in the lines, colored over the butterfly with a Versamark marker and heat embossed it using clear embossing powder and a heat gun.
Over stamped the Butterfly with the leaf stamp by first loading the stamp with Versamark and then Lettuce ink before stamping.
Heat embossed leaf with clear embossing powder and a heat gun.
Sponge Butterscotch ink on the card stock using a circular motion.
Stamped Side “A” of the marble texture cube with Mountain Rose ink. I missed taking a picture of it, but I sponged some of the Mountain Rose ink on the card stock after the cube stamp ink had dried some. (Sorry, but it is very early in the morning when I create these tutorial, lol)
Sponged some Ginger ink around the outer edges using a pouncing motion.
Getting darker yet by sponging some Espresso ink around the outside edges, not covering the Ginger ink completely.
Getting even more darker, sponged black ink at the corners.
Stamped side “C” of the marble texture cube around edges with Espresso ink.
After ink has dried for a few moments I took an old rag and wiped the ink from the embossed images.
Punched 2 window punches from Chocolate Chip card stock and drug the ends of them across a black ink pad.
Oops! Sorry you had to look at my grungy stamping pad in the last picture, lol. Really keeping it real this morning!
Assembled card front and stamped the sentiment in Espresso ink.
Here is the finished creation measuring 5″ x 6.5″.
Hope you enjoyed this tutorial and will give it a try!
Hope your day is filled with beautiful sun shine and Spring weather!
Until my next post. . . . .
Michelle


44 responses to “Butterfly Season – Tutorial”