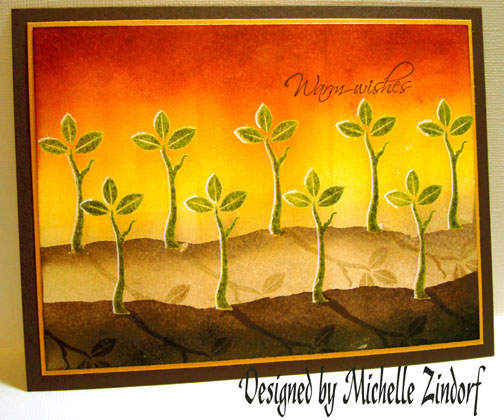
This is for all my fellow gardeners out there. This branch from Stampin’ Up’s Spring Solitude set has always reminded me of a seedling. So here it is as such.
Ready for the tutorial? Let’s get to it!
Supplies:
| Stamps: Stampin’ Up Spring Solitude, Hugs & Wishes |
| Paper: Stampin’ Up Whisper White, More Mustard & Chocolate Chip |
| Ink: Stampin’ Up Creamy Caramel, Chocolate Chip & Basic Black, Adirondack Lettuce, Butterscotch & Rust |
| Accessories: Versamark Pad, Brayer, Clear embossing powder, heat gun, Post it notes, Stamp-a-ma-jig, White Gel Pen, Sponges |
Stamped a row of seedlings on Whisper White card stock by loading my stamp first with a Versamark pad and then with Lettuce ink before stamping. I had to use a Stamp-a-ma-jig for placement because I cannot for the life of me stamp in a straight line, lol.
Heat embossed images with clear embossing powder and a heat gun.
Stamped a second row the same as the first with Versamark and Lettuce ink. Heat embossed second row with clear embossing powder and a heat gun.
Brayered on Butterscotch ink in the sky area.
Brayered on Rust ink at the top of the card stock, not covering the Butterscotch ink entirely.
Brayered on Creamy Caramel ink on the ground area.
Masked the sky area with post it notes that have been torn on the sticky edge side.
Lightly sponged Chocolate Chip ink in a circular motion at the torn edge of the post it notes. This will create the horizon line.
Moved the post it notes down to create the mound of dirt for the seedlings in the foreground.
Sponged Chocolate Chip ink heavily on the bottom of the card-stock, covering the entire unmasked area.
Removed mask and sponged Basic Black ink at the very bottom of the card stock.
Heavily sponge some Rust ink at the top of the card stock to create a little interest in the sky area.
Time to put in some shadows 🙂
Using my Stamp-a-ma-jig for placement I stamped the seedling again to create the shadow for the back row of seedlings with Creamy Caramel ink.
Using the Stamp-a-ma-jig again for placement, stamped the shadows for the first row of seedlings using Chocolate Chip ink.
Using the Stamp-a-ma-jig again and stamped my sentiment with Chocolate Chip ink. We’ve gone to far now to stamp the sentiment crooked, lol.
Used a White Gel Pen to highlight the left sides of the seedlings. This makes them look like they are back lite.
Assembled card and here it is complete. This finished card measures 5″ x 6.5″.
Hey, I want to thank everyone for visiting my blog. I am shock to see that my blog counter has went over 100,000!!!!
Also, I broke down and purchased a camcorder. My hope is to figure out how to use it and do a few technique videos. Would anyone be interested in seeing a video on Brayering? 🙂
May your day be filled with new growth and sunshine!
Until my next post. . . . .
Huge Hugs,
Michelle


81 responses to “Seedling Sunset”